
Table of Contents
The ESP8266 NodeMCU with KY-20 tilt switch module is a powerful Wi-Fi-enabled microcontroller widely used in IoT projects. When paired with a simple yet effective component like the KY-20 tilt switch module, it becomes easy to add tilt or orientation-based triggers to your electronics setup. This comprehensive guide walks you through everything you need to know about using the KY-20 sensor with the ESP8266, from wiring and coding to real-world applications.
Understanding the Components
ESP8266 NodeMCU
The ESP8266 NodeMCU is an open-source firmware and development board designed for IoT prototyping. Key features include:
- Built-in Wi-Fi
- GPIO pins for sensor inputs
- USB-to-serial interface for easy programming
- Compatibility with the Arduino IDE
It is ideal for home automation, remote monitoring, and IoT device control.
KY-20 Tilt Switch Module
The KY-20 is a mercury-free tilt switch that detects changes in orientation. It acts like a basic ON/OFF switch depending on its tilt status. Features include:
- Digital output signal
- Operating voltage: 3.3V – 5V
- Compact and simple design
This sensor is commonly used in fall detection, orientation monitoring, and alarm systems.
Wiring the KY-20 to ESP8266 NodeMCU
Before coding, you must connect the KY-20 properly to your ESP8266 board. Here’s how:
- KY-20 VCC to 3.3V on ESP8266
- KY-20 GND to GND on ESP8266
- KY-20 Signal to D1 (GPIO5) on ESP8266
Refer to this KY-020 Tilt Detection Tutorial for visual guidance.
Circuit Diagram Overview
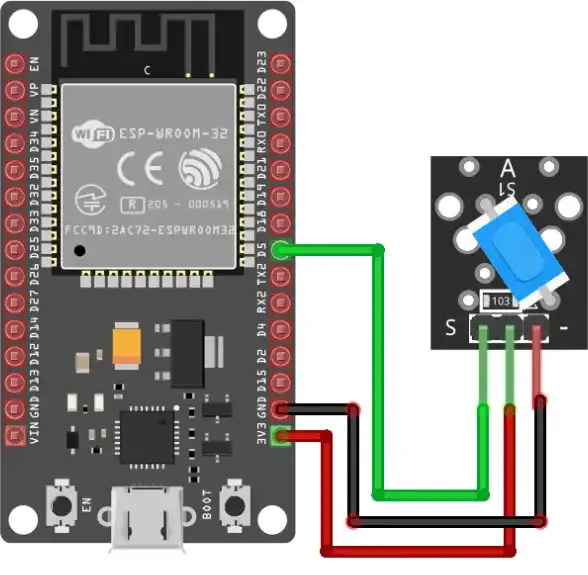
Using a breadboard, assemble the KY-20 and ESP8266 as per the above wiring. Keep wire lengths short to avoid signal noise. Ensure stable power supply to prevent false triggers.
Programming the ESP8266 for Tilt Detection
Setting Up the Arduino IDE
To program the ESP8266, install the latest Arduino IDE and configure it to support ESP8266 boards:
- Go to File > Preferences.
- Add this URL to Additional Boards Manager URLs:
http://arduino.esp8266.com/stable/package_esp8266com_index.json - Navigate to Tools > Board > Boards Manager, search for “ESP8266” and install it.
You can follow this ESP8266 NodeMCU Getting Started Guide for more details.
Sample Arduino Code
#define tiltPin D1

void setup() {
  pinMode(tiltPin, INPUT);
  Serial.begin(9600);
}

void loop() {
  int tiltState = digitalRead(tiltPin);
  if (tiltState == HIGH) {
    Serial.println("Tilt Detected!");
  } else {
    Serial.println("Stable");
  }
  delay(500);
}
Upload and Test
- Connect your ESP8266 to your computer via USB.
- Select the correct board and COM port from the Tools menu.
- Upload the code and open Serial Monitor.
- Tilt the sensor and observe the status updates.
Applications of KY-20 with ESP8266
Tilt-Activated Alarm System
This project triggers a buzzer or alert if the sensor detects movement. Use cases include:
- Anti-theft alarms
- Tamper alerts for sensitive devices
- Vibration detection systems
IoT-Based Tilt Monitoring with MQTT
Use MQTT to send tilt data over Wi-Fi:
- Publish tilt status to a topic
- View or control data using a dashboard
- Integrate with home automation platforms
Troubleshooting Common Issues
- Sensor not responding: Check wiring and ensure correct pin mappings.
- False triggers: Add software debouncing using
delay()or time stamps. - No serial output: Confirm Serial Monitor is set to 9600 baud.
- Power issues: Ensure stable 3.3V power supply.
FAQs
How does the KY-20 tilt switch work?
It uses a metal ball inside to complete a circuit when tilted beyond a certain angle.
Can the KY-20 detect tilt angles?
No, it only provides binary output (tilt or no tilt).
Is the KY-20 compatible with Arduino?
Yes, it works with Arduino, ESP8266, Raspberry Pi, and other microcontrollers.
How to calibrate the KY-20?
It doesn’t require calibration. Orientation can be adjusted manually.
Can I use multiple KY-20 modules?
Yes, each must connect to a unique GPIO pin.
Conclusion
Combining the ESP8266 NodeMCU with the KY-20 tilt switch module opens up exciting possibilities for creating motion-sensitive and orientation-based systems. Whether you’re building an alarm system, monitoring devices remotely via IoT, or adding tilt detection to your projects, this pairing provides an accessible and flexible solution. The beauty of this combination lies in its simplicity – with basic wiring and minimal coding, you can create responsive, wireless systems that respond to changes in orientation.
This setup is ideal for both hobbyists looking to explore the world of IoT and developers who want to quickly prototype and integrate tilt-based triggers into their systems. The ESP8266 NodeMCU provides powerful connectivity, while the KY-20 sensor delivers reliable tilt detection, making it easy to add new functionalities to your existing devices.
Whether you’re working on a smart home project, a security system, or even an interactive IoT application, this setup offers a solid foundation. As you experiment and integrate more sensors or expand to complex systems, you’ll discover the vast potential of combining simple components like the ESP8266 and KY-20. Start experimenting today and take your IoT projects to the next level!
Projects ESP8266 nodemcu :
1- ESP8266 NodeMCU: A Comprehensive Guide to IoT Development
2- Control LED with ESP8266 NodeMCU: A Beginner’s Guide
3- Integrating a Joystick with ESP8266 NodeMCU: A Comprehensive Guide
4- esp8266 nodemcu with Flame Sensor
5- ESP8266 NodeMCU with Heartbeat Sensor
6- ESP8266 NodeMCU with KY-027 Magic Cup Light
7- ESP8266 NodeMCU with Hall Magnetic Sensor
8- ESP8266 NodeMCU with relay module 5v
9- ESP8266 NodeMCU with Linear Hall Sensor